Monday, August 15

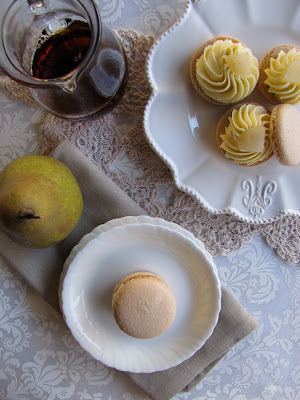
maple & pear macarons


It's sad to realise that for the better part of my life, I wasn't as close to maple syrup as I would have liked, and this is despite pancakes being one of the first things I learnt how to cook. I think it's fair in assuming that up until recent years, most Australian households were consuming... maple flavoured syrup. It's runnier, sweeter and sicklier. It has a funny after-taste and is just inferior. I forget the exact moment that I tasted real, thick, pure maple syrup for the first time, most likely because I was on such a sugary high that it simply didn't matter. But, I can never go back to maple flavoured syrup, even if it is about a quarter of the price. Sometimes, and often with food, quality matters. Paying extra is worth it.

Maple syrup goes so well with most fruits, but in Autumn and Winter, I try to consume as many pears as possible. So it's only natural that eventually I realised these two flavours could only be improved upon in one way: in macaron form. I would have loved to have slices of dried pear atop these macarons, but this was just one too many steps in between me and a mapley macaron. So there's a nice improvement to this recipe, if you have the patience.


Ingredients
For macarons:
150 gms ground almonds
150 gms icing sugar
110 gms egg whites, separated into 2 lots of 55 gms
150 gms white sugar
37 gms water
dash brown food colouring


For maple buttercream:
300 gms butter, at room temperature
400 gms icing sugar, sifted (approximately)
2 tbsps pure maple syrup (not maple flavoured syrup!)

For poached pears:
2 beurre bosc pairs, peeled
4 cups water
1 1/3 cups sugar
vanilla bean, split and seeds scraped


For the macarons shells, follow instructions as shown here.

While macarons are resting and baking, you can poach your pears. Place sugar and water in a medium saucepan, and heat until the sugar has dissolved. Add the vanilla bean and seeds and your pears, covering with a cartouche to assist pears to cook evenly and to assist in reducing the liquid slightly. Simmer for about 20 minutes until just soft, and allow to cool in the sugary liquid. 

Once macarons have been baked and cooled, completely, make your maple buttercream. Mix the butter in the bowl on an electric mixer fitted with the paddle attachment, starting on a medium speed and increasing to high, until butter is smooth. Gradually add the icing sugar and maple syrup, whipping until at your desired consistency. 

Pipe buttercream onto half of your macaron shells, and top with a small piece of diced poached pear. Sandwich with remaining macaron shells.


Another way to subtly change your flavours would be to add extra flavours and spices to your poaching liquid: star anise, citrus peel, cinnamon. The options and endless, really. You could also then add some of your poaching liquid into the maple buttercream... I wish I'd thought of that earlier.

Recommended baking soundtrack: Horse Feathers - Thistled Spring. 


Sunday, August 7

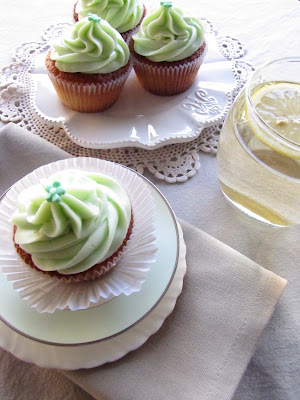
elderflower cupcakes


I adore subtle floral flavours in baking: rosewater, orange blossom, lavender. So, why has my elderflower consumption up until this point been solely limited to a mixer that compliments gin (which is a pretty amazing combination, gin-lovers)?! Thankfully, I was surprised to discover not only whoopie pies, but a beautiful selection of cupcake recipes in 'Let's Make Whoopies', a fantastic and wonderfully presented book by Sophie Grey. My favourite, of course, was this attached recipe.

Elderflower is incredibly light and refreshing, and works perfectly with citrus. It's flavour is pretty subtle, so when adding it to the cream cheese, you may find you need more than what I've specified below. Sophie's original recipe suggested using elderflowers in addition to elderflower cordial in the cake mixture, so if you're lucky enough to be in a warmer climate than I currently am, give this a shot.

Ingredients (makes 12)
Recipe slightly adapted from Sophie Grey's 'Let's Make Whoopies' 

For cake:
175 gms self raising flour
2 tsps elderflower cordial
125 gms butter, at room temperature
175 gms caster sugar
2 eggs, lightly beaten
40 mls milk

For frosting:
50 gms butter, at room temperature
250 gms cream cheese, at room temperature
500 gms icing sugar, approximately
3 tsps elderflower cordial (or more, to taste)
green food colouring (I use Wilton Kelly Green)


Preheat your oven to 180C. Line a 12 cup capacity cupcake tray with liners.

Using an electric mixer fitted with the paddle attachment, cream together the butter and sugar until pale and fluffy (about five minutes), scraping down the sides of the bowl regularly. Slow the speed of your mixture down, and gradually add the beaten egg, a little at a time, again, whilst scraping down the sides of your bowl. Gently fold in the flour and milk, being careful not to over-mix. Stir through the elderflower cordial.


Divide the mixture evenly among your 12 cases (just over 2 tbsps per case), and bake for 15 - 20 minutes, until golden and lightly springy to the touch. Remove from tray immediately and cool on a wire rack.

When the cupcakes have cooled, mix the cream cheese and butter with an electric mixer until smooth and creamy. Gradually add icing sugar, about 1/2 cup at a time, beating well after each addition. You may find you need more or less icing sugar than recommended - this is really up to personal taste. To pipe your mixture, it should be able to hold it's shape. Add a very small amount of food colouring before filling a piping bag with a star tip, and generously piping frosting onto cupcakes.


It seems amongst all the recent madness in my life, I have been consumed with macarons, five layer tiered cakes, and other time consuming treats that I've forgotten how satisfying making a quick and easy batch of cupcakes can be, not to mention how much easier they are to travel with! Im sorry I left you, cupcakes. Let's make up. 

Recommended baking soundtrack: Bill Callahan - Sometimes I Wish We Were An Eagle.

Sunday, July 31

apple & blackberry pandowdy


Incase I haven't already toted on enough about how I prefer the milder seasons to an all imposing Brisbane Summer, let me bust into a monologue about desserts. Ice cream, sorbet and gelato are all wonderful. There are few things I love more than spontaneously deciding to go out for gelato at 8pm on a weeknight. But, these few things include Wintery desserts such as custards, crumbles, puddings, pies, pandowdies... Pandowdies?! According to my bible - AGT - a pandowdy is a pie whose lid is smashed (dowdied!) during the cooking process. The result is delicious jumble of pastry, berries and sweet juices making a mess all up in your oven.

This recipe uses a sour cream pastry which is so easy to make, and is wonderfully rich against apples and blackberries. Or, any other fruit, I imagine. A sprinkling of demerera (or raw, if you're desperate) sugar adds a little sweetness and crunchiness that is always welcome in my house.


Ingredients
Recipe from AGT August 2011


For pastry:
250 gms plain flour
40 gms pure icing sugar
rind of 1 lemon, finely grated
seeds of 1 vanilla bean
140 gms cold butter, cubed
120 gms sour cream (no low fat, please!)

For filling:
4 each granny smith and pink lady apples, cut into eighths
300 gms caster sugar
150 gms frozen blackberries
40 gms plain flour
juice of 2 mandarins
rind of 1 1/2 lemons, finely grated

demerera sugar, for sprinkling

For your pastry, process the flour, sugar, vanilla seeds, rind and 1/2 tsp salt in a food processor to combine. Add butter and pulse for about 30 seconds, until only small lumps remain. Add the sour cream, and pulse until mixture beings to come together. Turn the mixture out onto your bench top, and bring together with the heel of your hand. Form into a disc, wrap in plaaaastic, and allow to rest in the refrigerator for two hours.

Preheat your oven to 200C. Combine all of your filling ingredients in a large bowl before transferring to a generous pie dish.

Roll out the pastry on a lightly floured surface until 4mm thick. Brush the edges of the pie dish with water before placing pastry over the filling and pressing the rim of the dish to seal. Trim the edges with a sharp knife, and pierce a hole in the centre of your pastry. Lightly brush your pie with water and generously scatter the demerera. Bake for about 35 minutes until the pastry is crisp and golden.

Remove from the oven, and break pastry into pieces with a fork, pressing down into the filling. Bake until the filling bubbles over the pastry, and the pastry is dark and golden brown - about 25 minutes.


I usually have an inability to love the results of my baking unless it is aesthetically perfect, something that can be very exhausting at times. But I love the appearance of this dowdied pie, and can see myself squashing and re-baking plenty more pies in the future... It's strangely very satisfying. I can also see bakers with pie failures now feeling confident knowing their pies aren't deformed misfits, but are in fact a new and delicious addition to their dessert repertoire!

Recommended baking soundtrack: Grass Widow - Milo Minute.