Showing posts with label gluten-free. Show all posts

Saturday, August 21

pistacho & rose macarons


It seems I'm rarely ever baking simply because I want to eat something. I'm not just baking because I'm craving choux pastry and custard, or because I've got a spare hour in a day to make chocolate chip cookies. I've always got a new product I want to try out. A new cookie cutter, piping tip or bundt tin. Today, it was a recently purchased Jane Lamerton tea set and a simple little pot of 'Kelly Green' Wilton food gel that gave me the craving to cook.

There's nothing wrong with this. I adore baking, whatever it is or whatever it's for. It's just a shame that I tend to neglect some poor recipes once I have conquered them. I should be more loyal to ones that have treated me kind.

But, today I made macarons. Of course. Rose and pistachio: a fairly safe and tasty combination. But more importantly, I just simply cannot get over how perfectly the beautiful greens of my tea set and this food gel match! I adore this colour. Forgive me if all of my creations are from this point forward 'Kelly Green'.


I figured I would also try yet another macaron recipe for this morning's project, and adapted one used by Linda @ Bubble and Sweet, based on a recipe by Pierre Hermé.

Ingredients (makes 46! depending on size)

For macaron shells:
300 gms ground almonds
300 gms pure icing sugar
220 gms egg whites, aged at least 3 days, separated into 2 lots of 110 gms
dash green food colouring (gel or powder is preferable as less is required)
300 gms granulated sugar
75 gms water
50 gms pistachios, finely chopped

For rose buttercream:
460 gms icing sugar, sifted
225 gms unsalted butter, room temperature
1 tablespoons cream
1 tsp rosewater, or more to taste
dash pink food coloring

Mix the ground almonds and icing sugar together and pulse a few times in food processor to make almond meal finer. Do not over process as the meal can become oily. Sieve into a large bowl. Add food colour ing and 110 gms of the egg whites to the sugar/almond mixture but don’t mix in. Set aside.

Place remaining 110 gms of egg whites in bowl of mixer fitted with the whisk.
Place granulated sugar and water into saucepan, stir to combine and cook without stirring to 118C. Once the mixture reaches 115C start mixing the egg whites on high. Once the sugar syrup reaches 118C remove from heat and immediately pour in a thin stream down the side of the mixer bowl continuing to whisk on high. The eggs whites should be at firm peaks by the time your syrup reaches this stage. Continue to whisk the meringue on high until the side of the bowl is only a little warm to touch. The meringue mixture should be beautifully glossy.

Add meringue mixture to almond mixture and using a large spatula fold the mixture together until it starts to shine and forms a ribbon that stays visible for about 30 seconds.

Add the mixture to a piping bag fitted with a plain tip and pipe in lines onto baking trays lined with baking paper. Tap trays on the bench a few times to eliminate any air bubbles. Sprinkle with pistachios.
Set aside for about 30 minutes or until the macarons have formed a skin that doesn't stick to your finger.

Meanwhile preheat oven to 140C . Bake the macaroons for around 13 to 15 minutes depending on size, they should not be browned. Remove the baking trays and immediately slide off the macarons and the baking paper onto the work surface and let cool completely before removing the shells.


For rose buttercream, beat butter in the bowl of an electric mixer until smooth and creamy. Gradually add the sifted sugar, scraping down the sides of the bowl occasionally. Add the cream and beat until light and fluffy. Beat in the rosewater, adding a little more or a little less depending on your own taste.Add a little more cream or confectioners sugar to reach the desired consistency.

Once shells have cooled, match disks into like sizes and sandwich together using the rose butter cream. I piped the buttercream on, but it could easily be spread on if you a little less sweetness. And these are pretty sweet!


I love the result of this recipe and I really hope I remember to come back to it next time I'm messing around with flavour combinations. My shells were a bit puffy, but I think I could have mixed the mixture a little more; it's always so hard to tell. But the surface and feet of each beautiful. Now what to do with close to 50 macarons... 

Recommended baking soundtrack: Au Revoir Simone - The Bird of Music.
Monday, August 9

annette's birthday bash

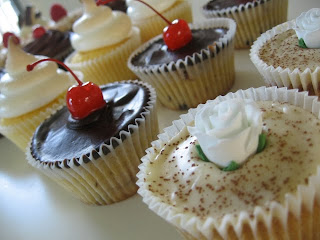
Clockwise, from bottom: Raspberry & coconut cake, chocolate & cherry cake, white russian cake, chocolate & orange cake, ginger & honeycomb cake. Centre: Lemon & coconut meringue cake. 

I had the pleasure of attending - and baking for - one of my dear co-worker's 60th birthday on Saturday evening. 60 guests, 70 gluten-free cupcakes. Two days of baking.


Annette is the perfect customer. She had all six cake varieties chosen weeks before the event, and had bought me almost all of the ingredients the week before! To make sure the cakes were as fresh as possible, I decided to do the baking on Friday, the decorating on Saturday. This meant a relaxed pace without stress, and even some room for failure. I didn't, however, anticipate running out of ingredients I simply never run out of - cream, ground ginger, caster sugar. So instead of finishing at around lunch on Saturday, I was boxing them all up five minutes before walking out the door. Despite the severe feeling of anxiety, there's something so wonderful about baking-adrenalin. What's even more wonderful is seeing a whole room full of people consuming your baked treats.


Happy birthday, Annette.


Recommended baking soundtrack: Andrew Bird back catalogue. 

Friday, July 9

bourke street bakery's flourless chocolate cake


Between my eleven co-workers, there are seven dietary requirements. Because of this, I'm always on the lookout for a good gluten free dessert recipe. Most of the time this means I'm relying on gluten-free flour, which though blows my options sky high, just doesn't work with all cake recipes; Layer cakes crumble too much when cutting, recipes with a heavy batter need a little something extra to hold it together, and those without a great deal of other flavourings or fillings have a slightly unexplainable aftertaste.

It seems my recent adventures in baking have been addressing some of my culinary fears. I find the idea of flourless chocolate cakes so much lovelier than they ever turn out to be. In theory, they perfectly address my need for a workplace-worthy dessert; Rich, wonderful either warm or at room temperature, and a decent shelf-life. But, I like my cakes high and proud, with perfect edges and a beautiful plateaued surface. The potential of a slightly sad, flat, shriveled and concave cake has always meant I steer well clear of flourless cake varieties. But seeing and reading about Bourke Street's recipe, and having tasted and baked a safe number of their other sweet treats, I had to give this a shot. Since then, I've made this cake twice in a mere week.

Ingredients (serves 12, generously)
Recipe from Bourke Street Bakery: The Ultimate Baking Companion

260 gms dark chocolate (55% cocoa), finely chopped
135 mls milk
40 gms full-fat yoghurt
4 eggs
105 gms caster sugar, for eggs
4 egg whites
160 gms caster sugar, for egg whites
135 ml (4 1/2 fl oz) pouring (whipping) cream (35% fat)
55 g (2 oz) unsweetened cocoa powder, sifted

Preheat the oven to 150C. Grease a 20 cm springform cake tin and line the base and sides with baking paper - the paper should come about 2.5 cm above the tin.

Put the chocolate in a large stainless steel bowl and set over a saucepan of simmering water, making sure the base of the bowl does not touch the water - the bowl must be large enough to hold the whole cake mix. Allow chocolate to sit over simmering water without stirring until almost melted. Remove from heat, mix until smooth.

Put the milk and yoghurt in a saucepan over medium-high heat and bring to the boil. Remove from heat. Don't worry, you should have a curdled milk mixture.

Put the eggs and the sugar for the eggs in the bowl of an electric mixer fitted with a whisk attachment. Whisk the eggs at medium speed for about 10 minutes, or until the mixture is very light and has doubled in volume. Set aside.

In another very clean and dry bowl of an electric mixer, whisk the egg whites to soft peaks, then slowly add the sugar for the whites, whisking until soft peaks form a shinny meringue. Be careful not to overwhisk. Refrigerate until needed.

Whisk the cream until soft peaks form. Refrigerate until needed.

You should now separate bowls of melted chocolate, curdled milk, whipped eggs, meringue, whipped cream and cocoa powder. Pour the curdled milk into the chocolate and use a whisk to mix it in, then add the cocoa and whisk to completely incorporate. Fold in the whipped eggs in three batches, making sure you completely incorporate the first batch before adding more. Don't be too concerned if you can still see streaks of eggs with the following batches. Lightly fold the meringue into the whipped cream, taking care not to knock out too much air. Fold this into the chocolate mix in three batches, making sure you incorporate the first batch before adding more.

Using a spatula, scoop the cake batter into the prepared tin and tap it twice gently on the bench to even out the mix. Bake for 1 hour 15 minutes to 1 hour 30 minutes.

Do not disturb the cake for the first 45 minutes of cooking, after which time you should rotate it to ensure even cooking. You may need to cover the top of the cake with baking paper and lower the oven temperature if the top of the cake is starting to brown, but it didn't come to this for me. Test to see if the cake is baked by gently placing your hand on top of it and wobbling it a little, you should feel that the cake has set through. Remove from the oven the allow to cool for about 30 minutes in the tin before removing the sides. When completely cool, slide the cake onto a serving plate, to serve. I finished it with a dusting of cocoa.


It is best to use a sharp fine-bladed knife to cut this cake. Have a jug of very hot water, dip the knife in, and leave for about 10 seconds to warm the blade through. Dry the knife on a tea towel before slicing. Repeat this process after every slice for a perfectly clean cut.

The cake can be kept at room temperature  in an airtight container for a couple of days, or in the fridge for up to five days. I usually prefer all chocolate cakes warm, but this one is honestly as good at room temperature. It can be freshened up by placing it in a 150C oven for about ten minutes. Best eaten with double cream.


So this cake isn't picture perfect. It's cracked and slightly weak at the knees, but I find its ugly character utterly charming. It doesn't hurt that it tastes like heaven, of course.

And please don't let the length of this recipe intimidate you. All techniques used are simple, you just have to be organised, with plenty of bowls and a patience for strictly sticking to the recipe.

Recommended baking soundtrack: Peter & the Wolf - Lightness.