Monday, January 3

chocolate & mint whoopie pies


Baking trends are a funny thing. To make cupcakes ten years ago involved a vanilla cake with buttercream, possibly including coloured sprinkles for those feeling adventurous. Few people had tasted proper French-style macarons let alone churned them out of their own home kitchen. And now, the whoopie pie. Ah, the whoopie pie... I'm not sure if this delightful cake-biscuit hybrid (also known as moon pie) has hit Australia with as much momentum as cupcakes, macarons or cake (or cookie!) pops, but there's certainly no reason why it shouldn't, especially with books out there whose sole purpose it is to teach us the very basic tricks to the perfect whoopie.

I've been put off making whoopie pies for a while now, simply because I was convinced I would eventually stumble across the marshmallow fluff suggested to make the perfect filling. This obviously didn't happen, and here I was months later, whoopie-less. Buttercream is a possibility, but just doesn't quite fit. Melting marshmallows with cream works, but just isn't the same. But! The closest and possibly even better filling is one of my favourite frostings: a marshmallow frosting that holds its shape and is very easy to inject flavour into. Of course, I chose peppermint.

One last thing before the recipe: I know vegetable shortening (Copha is perfect) seems like a funny addition to a cake that already contains butter, but it really adds lightness to the cake and makes it incredibly soft. It also helps avoid your whoopies having cracked surfaces. So please, trust the recipe.


Ingredients (makes approximately 24 whoopie pies)
Recipe adapted from Whoopie Pies: Dozens of Mix 'em, Match 'em, Eat 'em Up Recipes

For whoopies:
1 2/3 cups plain flour
2/3 cocoa powder
1 1/2 tsp baking soda
1/2 tsp salt
55 gms unsalted butter, at room temperature
55 gms vegetable shortening
1 cup dark brown sugar, firmly packed
1 egg
1 tsp vanilla bean paste
1 cup full-fat milk

For marshmallow filling:
3 egg whites
1 1/2 cups white sugar
2 tsps glucose syrup
pinch of cream of tartar
2 tsps peppermint essence, or to taste

To make the whoopies (cakes), preheat oven to 190C. Line two baking sheets with baking paper.

Sift together the flour, cocoa powder, baking soda and salt. In the bowl of an electric mixer fitted with the paddle attachment, beat butter, shortening and brown sugar on a low speed until combined, then increase speed to medium and beat until light and fluffy - which will take at least three minutes. Add the egg and vanilla, and beat for a further two minutes until fully incorporated.

Add half the flour mixture and half the milk to the batter, beating on a low speed until just combined. Scrape down the sides of the bowl, and add remaining flour mixture and milk, beating until smooth and creamy.

Drop 1tbsp quantities of batter onto baking trays, leaving about 5cm between each whoopie, as they will spread when cooking - you will obviously need to do multiple batches, so be generous and give your first lot of whoopies (I just love saying whoopies!) lots of space to grow during the first time around. You can always squash them together a little more after some experience. Bake for ten minutes - one sheet at a time - for about ten minutes. The pies should spring back when pressed gently, like any sponge. Remove from the oven and let them cool on the baking sheet for about five minutes before transferring to a wire rack to cool completely before filling.

For the marshmallow filling, combine the egg whites, sugar, corn syrup, cream of tartar and 100 mls water in a heatproof bowl (preferably the bowl of your electric mixer to save on washing up). Sit the bowl over a saucepan of simmering water, and whisk quite vigorously for five minutes until mixture is light and foamy-- this will feel like a very long five minutes! Alternatively, if you you have handheld beaters, you could use these - it will save you time and sweat. Remove from heat. Add peppermint and beat with electric mixers on a high speed until stiff peaks form.

Generously pipe, spread or dollop marshmallow filling onto half of the whoopies. Allow to set for five to ten minutes before sandwiching them with the remaining whoopies. This will allow the filling to set slightly. Eat & enjoy.


These can be tricky to store, as the cake becomes very sticky quite quickly. It is suggested they are eaten on the same day as being made, but I consumed one the day after and thought they tasted even better. Just make sure you don't stack them if you can help it, and if you can't, place a layer of baking paper in between to prevent them from sticking to one another.

Recommended baking soundtrack: Built to Spill - There Is No Enemy.

Monday, December 20

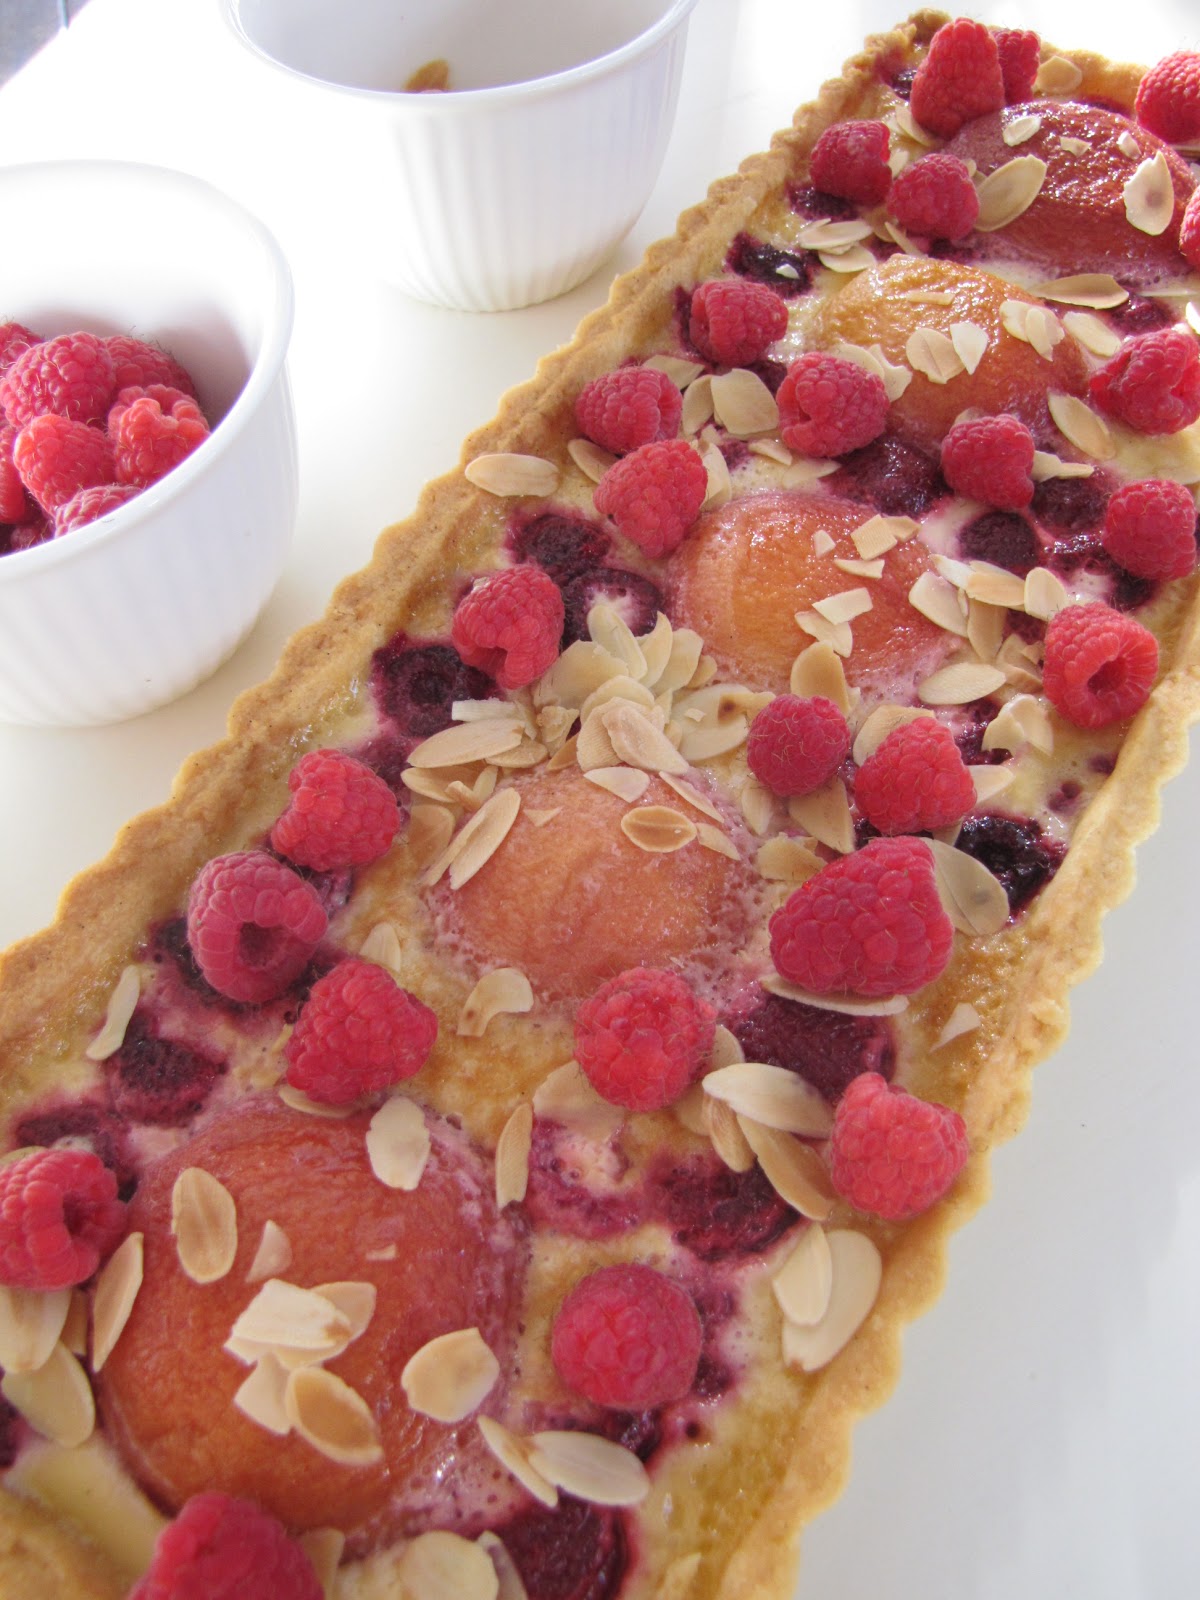
peach melba tart


I'm an unashamed Autumn/Winter-person. That doesn't necessarily mean I love extremely cold weather, given a Brisbane Winter hardly reaches below 10C. I do, however, loathe the humidity, squinting, and sunburn that Summer generally involves. As the years pass by, I think I'm becoming more tolerant and can now appreciate more daylight hours. I accept that beautifully thick rhubarb stems are less readily available. I'll even admit that lemon lime & bitters tastes better on a warm Summer's afternoon. But what I really miss during my favourite cooler seasons are raspberries. And peaches. And this Summer, haven't the raspberries been spectacular?

Ingredients (generously serves 6)
Recipe from delicious. More Please

For pastry:
1 2/3 cups plain flour
2 tbsps icing sugar
1 vanilla bean, split, seeds scraped
180 gms chilled unsalted butter, chopped
1 egg yolk

For filling:
3 ripe peaches
200 mls pouring (thin) cream
1 vanilla bean, split, seeds scraped
2 eggs, plus 1 extra yolk
1/4 cup caster sugar
250 gms raspberries

2 tbsps flaked almonds, toasted
icing sugar, to dust


For the pastry, process flour, icing sugar, vanilla seeds and a pinch of salt in a food processor until there are no lumps. Add the butter and process until sandy. Add the yolk and 1 tbsp chilled water, processing until the mixture comes together in a smooth ball. Remove pastry from food processor (kneeding a little if necessary), cover with plastic wrap and chill for 1 hour.

Grease a 12x35cm loose-bottomed tart pan. On a lightly floured surface, roll out the pastry to 3 - 5mm thich and use to line the pan, pressing gently into the base and sides. Trim to fit, then chill for 30mins.

Preheat the oven to 190C. Line pastry with baking paper and fill with pastry weights (or uncooked rice/beans/lentils) and blind bake for ten minutes. Remove weights and baking paper and bake for a further 5 minutes until pastry is golden and dry. Reduce the oven to 170C.

For the filling, blanch the peach halves in a large saucepan of boiling water for 1 minute. Remove, allow to cool slightly, peel, then place on some paper towel and gently pat dry.

Heat the cream and vanilla pod and seeds in a saucepan over medium heat until just below boiling point. Gently whisk the eggs and extra yolk with the sugar in a large heatproof bowl. Slowly whisk the hot cream mixture into the whisked eggs. Remove vanilla pod.

Place the peaches, cut side down, in the tart shell and scatter with half the raspberries. Slowly pour the cream mixture into the tart shell, and bake for 30 - 40mins until the custard is set. Cool slightly, then dust with icing sugar and serve with a scattering of flaked almonds.


I freaked out a little in finding that my tart had set so soon - after about 20 minutes! So please keep a good eye on it during the cooking period to avoid the disappointment of over cooked or even burnt custard. delicious also suggest using Careme vanilla bean sweet shortcrust pastry, as they do quite often throughout this book, and doing so would make this simple recipe even quicker. Sounds good to me!

Recommended baking soundtrack: Thee Oh Sees - Warm Slime. 

Tuesday, December 7

turkish delight macarons


I am by no means a health nut. I like gentle exercises: pilates, yoga, swimming... does strolling count? I do fall off the pilates wagon every once in a while and can go through lengthy periods of times without "exercise", but console my inner couch-potato by reminding myself that I have a fairly physical job. But over the weekend, I felt physically unfit for the first time in as long as I can remember... whilst folding a double batch of macarons. Due to an unintentional baking hiatus, I have lost my ability to hand-whip potatoes, whisk cream and most importantly, fold macaron batter the many times it requires to become beautiful and shiny. I pride myself on this ability. I am thoroughly devastated.

Despite my now sore right arm, these are my favourite macarons of the year, largely due to a new oven. Each are sandwiched with a rose infused, whipped dark chocolate ganache, and contain a small bite of turkish delight in the centre.


Ingredients


For macaron shells:
Recipe courtesy of Bubble and Sweet (based on a Pierre Herme recipe)
150 gms ground almonds
150 gms icing sugar
110 gms egg whites, separated into 2 lots of 55 gms
150 gms white sugar
37 gms water
dash pink food colouring

For ganache:
200 gms good quality dark chocolate, 70% cocoa solids
1/2 cup cream
few drops rosewater
1 - 2 cups icing sugar

About 100 gms turkish delight, chopped into 1cm cubes.

For the macarons, mix the ground almonds and icing sugar together and pulse a few times in food processor to make almond meal finer, being careful not to over-process and release the oil in the almond meal. Sieve into a large bowl. Add colour and 55 gms of the egg whites to the sugar/almond mixture but do not mix in.

Place remaining 55 gms of egg whites in bowl of mixer fitted with the whisk.

Place white sugar and water into saucepan stir to combine and cook without stirring to 118C. Once the mixture reaches 115C start mixing the egg whites on high. Once the sugar syrup reaches 118C remove from heat and immediately pour in a thin stream down the side of the mixer bowl continuing to whisk on high. Continue to whisk the meringue on high until the side of the bowl is only a little warm to touch. The meringue mixture should be beautifully glossy.

Add meringue mixture to almond mixture and using a large spatula fold the mixture together until it starts to shine and forms a ribbon that stays visible for about 30 seconds.

Add the mixture to a piping bag fitted with a plain tip and pipe in lines onto baking trays lined with baking paper. Tap trays on the bench a few times to eliminate any air bubbles.
Set aside for about 30 minutes or until the macarons have formed a skin that doesn't stick to your finger.

Meanwhile preheat oven to 140C . Bake the macaroons for around 13 to 15 minutes depending on size, they should not be browned. Remove the baking trays and immediately slide off the macarons and the baking paper onto the work surface and let cool completely before removing the shells.

For ganache, finely chop chocolate and place in a the bowl of your electric mixer. Place cream and rosewater in a small saucepan, and heat until it just begins to boil. Pour hot cream over the chopped chocolate, cover with a dinner plate (or saucepan lid, or... anything) and leave for 1 minute. Stir mixture until smooth, and allow to cool for ten minutes. Add 1 cup icing sugar to ganache, and whip using paddle attachment until smooth and slightly lighter in colour. Add more icing sugar until desired consistency - the mixture should just be able to hold its shape when piped, but should also be glossy-- about 1 1/2 cups of sugar should do. 

Place whipped ganache in a piping bag fitted with a plain 1cm tip, and pipe half the macaron shells with a dollop of filling. Top with a piece of turkish delight before sandwiching with remaining halves. 


Macarons are apparently better a couple of days after being filled, and prior to this recipe, I can't say I've really had many lying around after that point to really know the difference. I made these in the evening and had my first taste the morning after and could already taste how the flavour had developed and permeated the shell. So, if you can wait that long, fill them and leave them for at least a few hours, or a day if you are really self disciplined. 


Recommended baking soundtrack: Laura Marling - I Speak Because I Can.